Recreate Childhood Joy with This Easy Chocolate Pudding Recipe
Few desserts evoke the comforting embrace of childhood quite like a bowl of rich, creamy chocolate pudding. Forget the pre-packaged versions of yesteryear; this homemade chocolate pudding recipe is a revelation, transforming simple ingredients into a decadent, velvety treat that will transport you straight back to simpler times. Whether you’re seeking a nostalgic indulgence or a simple yet elegant dessert for your next gathering, this recipe promises pure joy, spoonful after irresistible spoonful.
The beauty of this particular chocolate pudding recipe lies in its elegant simplicity. It's quick to prepare, requires no fancy equipment, and uses everyday pantry staples. Best of all, it achieves that perfect, luscious texture without the need for eggs, relying instead on the humble power of cornstarch. Prepare to ditch those boxed mixes for good and discover the unparalleled delight of truly homemade chocolate pudding.
The Secret to Irresistible, Creamy Chocolate Pudding
What makes homemade chocolate pudding so utterly superior? It's the control over quality ingredients and the freshness that simply can't be matched by store-bought alternatives. This easy chocolate pudding recipe leans on a handful of components, each playing a crucial role in delivering that signature fudgy, smooth experience.
The Essential Ingredients for Perfection
- Sugar: Provides the perfect sweetness, balancing the intensity of the chocolate without overwhelming it. Feel free to slightly reduce the amount if you prefer a less sweet dessert.
- Baking Cocoa: This is where the magic happens! For a truly deep, robust chocolate flavor, invest in the best quality unsweetened baking cocoa you can find. A premium cocoa powder makes all the difference in achieving that rich, authentic taste.
- Cornstarch: Our thickening MVP! Cornstarch is the secret to achieving that wonderfully thick, glossy pudding texture without using eggs. It gives the pudding its body and helps it set beautifully once chilled. For a deeper dive into this incredible thickener, check out our guide to Unlock Decadent Chocolate Pudding: No Eggs, Just Cornstarch.
- Salt: Often overlooked in sweet recipes, a tiny pinch of salt is vital. It acts as a flavor enhancer, balancing the sweetness and intensifying the chocolate notes, making the pudding taste even more complex and delicious.
- Milk: For the most luxurious, rich, and indulgent pudding, whole milk is highly recommended. Its higher fat content contributes significantly to the creamy mouthfeel. While you can use lower-fat or even non-dairy alternatives, be aware that the final texture and richness may vary.
- Butter (or Margarine): Added at the end, butter contributes a beautiful silkiness and an extra layer of richness to the pudding. Real butter will offer the best flavor and texture; avoid shortening, as it won't yield the same results.
- Vanilla Extract: Just a teaspoon of pure vanilla extract provides a warm, aromatic depth that complements the chocolate beautifully, elevating the overall flavor profile.
With just these seven ingredients, you're on your way to creating 4-5 servings of pure dessert bliss in just minutes of prep time.
Your Step-by-Step Guide: Stovetop & Microwave Methods
This versatile chocolate pudding recipe offers two convenient methods for cooking, allowing you to choose what best suits your kitchen and schedule. Both methods are straightforward and deliver equally delicious results.
Classic Stovetop Method: A Culinary Dance
The stovetop method is a classic for a reason, offering precise control over the cooking process and ensuring a perfectly smooth, lump-free pudding. Here's how to master it:
- Combine Dry Ingredients: In a medium-sized saucepan, whisk together the 2/3 cup sugar, 1/4 cup HERSHEY’S Cocoa (or your preferred brand), 3 tablespoons cornstarch, and 1/4 teaspoon salt. Ensure there are no lumps in the cocoa or cornstarch.
- Gradually Add Milk: Slowly pour in 2 1/4 cups of milk, stirring constantly with a whisk to incorporate the dry ingredients smoothly. This gradual addition helps prevent lumps from forming.
- Cook and Stir: Place the saucepan over medium heat. This is the critical step: you must stir constantly. Use a whisk to scrape the bottom and sides of the pan to prevent scorching and ensure even thickening. Continue cooking until the mixture comes to a full boil.
- Boil and Thicken: Once boiling, continue to boil and stir vigorously for 1 minute. You'll notice the pudding thickening significantly during this time.
- Finish with Flavor: Remove the saucepan from the heat. Stir in 2 tablespoons of butter (or margarine) and 1 teaspoon of vanilla extract until fully melted and combined.
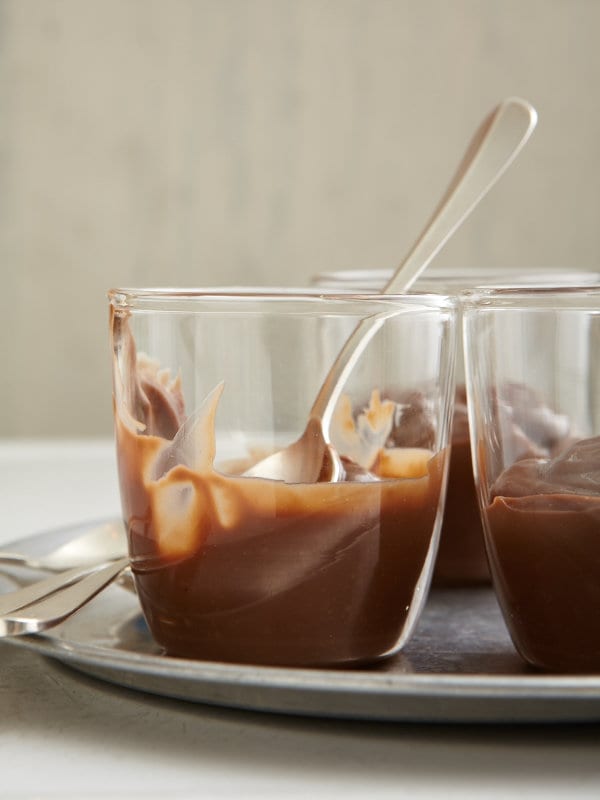
- Pour and Chill: Pour the hot pudding into individual dessert dishes or a single serving bowl. To prevent a "skin" from forming on top as it cools, immediately press plastic wrap directly onto the surface of the pudding. You can serve it warm for a comforting treat, or refrigerate it for at least 2 hours to allow it to set completely for a classic chilled pudding.
For more lightning-fast dessert ideas, including shortcuts and tips for speedy preparation, don't miss our Minute Prep: Your Go-To Quick Chocolate Pudding Recipe.
Microwave Magic: Speed and Simplicity
When time is of the essence, the microwave comes to the rescue, offering a super-fast way to achieve delicious results:
- Combine Ingredients: In a large microwave-safe bowl (ensure it's large enough to prevent boil-overs), stir together the 2/3 cup sugar, 1/4 cup HERSHEY’S Cocoa, 3 tablespoons cornstarch, and 1/4 teaspoon salt. Gradually stir in 2 1/4 cups of milk until smooth.
- Microwave and Stir: Microwave on high (100% power) for 7 to 10 minutes. The key here is to stir the mixture thoroughly every 2 minutes. This ensures even cooking and prevents lumps. Continue microwaving and stirring until the mixture comes to a full boil.
- Final Touches: Carefully remove the hot bowl from the microwave. Stir in 2 tablespoons of butter and 1 teaspoon of vanilla extract until well combined.
- Serve as Directed: Pour into individual dessert dishes and cover with plastic wrap pressed directly onto the surface to prevent skin formation. Serve warm, or chill for at least 2 hours for a firm, cool pudding.
Elevate Your Pudding: Serving Suggestions & Pro Tips
While this chocolate pudding recipe is undeniably delicious on its own, a few extra touches can transform it into an even more spectacular dessert. And with any recipe, a few insider tips can make all the difference.
Beyond the Spoon: Decadent Topping Ideas
Once your chocolate pudding is perfectly set and ready to enjoy, let your imagination run wild with toppings:
- Whipped Cream: A classic pairing! A generous dollop of freshly whipped cream adds a light, airy contrast to the rich pudding.
- Fresh Fruit: Sliced strawberries, raspberries, or banana coins add freshness and a pop of color.
- Chocolate Shavings or Chips: For the ultimate chocolate lover, a sprinkle of extra chocolate never hurts.
- Toasted Coconut Flakes: Adds a delightful texture and nutty flavor.
- Crushed Cookies: Oreos, graham crackers, or shortbread crumbs make a great crunchy layer.
- Caramel or Hot Fudge Drizzle: For an extra layer of decadence.
- Sprinkles: Especially fun for kids' parties or just to add a festive touch.
Troubleshooting and Smart Hacks
- Preventing Lumps: Always whisk your dry ingredients thoroughly before adding milk, and then stir gradually and consistently as you add the milk. This is the best defense against lumps.
- Dealing with Lumps (If They Happen): If you do end up with a few minor lumps, don't despair! You can often whisk them out vigorously while the pudding is still hot. For stubborn lumps, carefully push the warm pudding through a fine-mesh sieve before chilling.
- Avoiding Scorching: When cooking on the stovetop, use a heavy-bottomed saucepan. This distributes heat more evenly and reduces the risk of the pudding sticking and burning to the bottom. Constant stirring is also key.
- Adjusting Sweetness: If you prefer a less sweet pudding, you can slightly reduce the sugar amount (e.g., to 1/2 cup) without significantly affecting the texture.
- Make Ahead: Chocolate pudding is an excellent make-ahead dessert. Prepare it a day in advance and store it in the refrigerator with plastic wrap pressed directly onto the surface.
- Serving Temperature: While traditionally served chilled, many find warm chocolate pudding incredibly comforting, especially on a cold day. Experiment to find your preferred temperature!
This easy chocolate pudding recipe isn't just about making a dessert; it's about creating an experience. It's about revisiting cherished memories and forging new ones around a simple, honest pleasure. With minimal effort and maximum reward, you can whip up a batch of this velvety chocolate goodness that will bring smiles to faces, young and old alike.
